在平台中运行你的组件
欢迎来到本教程,如果你已经掌握了React的组件开发并成功安装了平台的开发环境,那么下一步我们将帮助你将你开发的组件放到平台中运行,从而完成基于平台的组件开发。
创建新页面
首先,让我们来学习如何在指定路由下创建自定义页面。你需要修改 index.js 文件,内容如下:
import React from 'react';
import { app } from 'xadmin';

// 定义一个简单的React组件
const TestComponent = () => {
    return <a>hello world</a>
}

// 在路由中注册自定义页面
app.use({
  name: 'iot.test',
  routers: {
    '/app/': {
      path: 'myTest', // 指定路径
      breadcrumbName: '我的测试组件页', // 面包屑名称
      component: TestComponent // 注册组件
    },
  }
})
在这段代码中,我们导出了一个对象,这个对象被称为一个扩展模块。该模块包含了多个可配置的属性,其中包括 name、routers 等。稍后我们将专门讲解所有的扩展属性。
通过上述操作,你应该可以在 /app/myTest 页面下看到 TestComponent 组件,页面将显示 "hello world"。这样你就成功创建了一个新页面,其中的 TestComponent 可以替换成你自己编写的任何React组件。
创建画面组件
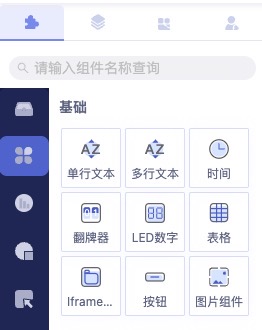
画面编辑器是平台的核心功能之一,编辑器中的小组件我们称之为 widget。widget 同样也是一个React组件。下面的代码演示了如何将一个React组件注册为一个新的 widget,就像下图所展示的 单行文本、LED数字 等。

通过 app.use 方法传入对象中添加 dashboardWidgets 属性进行扩展。
修改 index.js 文件,内容如下:
import React from 'react';
import { app } from 'xadmin';

// 定义一个简单的React组件
const TestComponent = () => {
    return <a>hello world</a>
}

// 定义一个简单的按钮组件
const TestButton = props => {
  const { text, fontSize=14, fontColor } = props
  return <button style={{ fontSize, color: fontColor }}>{text || 'Hello'}</button>
}

// 定义组件的可配置属性格式,使用json Schema格式编写
const paramSchema = {
  // 参数模式,这里定义了一个对象类型的参数模式
  type: 'object',
  // 包含的属性
  properties: {
    // 文字属性,用于定义文字内容
    text: {
      // 标题为“文字”
      title: '文字',
      // 类型为字符串
      type: 'string'
    },
    // 文字大小属性,用于定义文字的大小
    fontSize: {
      // 标题为“文字大小”
      title: '文字大小',
      // 类型为数值
      type: 'number'
    },
    fontColor: {
      title: '文字颜色',
      type: 'string',
      fieldType: 'color'
    }
  }
}


// 定义一个新的widget,注册为'测试按钮',并添加到组件中
const TestWidget = {
  title: '测试按钮', // 标题
  category: ['通用组件','自定义组件'], // 分类
  component: TestButton, // 组件
  initLayout: { width: 40, height: 20 }, // 初始化布局
  paramSchema // 可配置属性格式
}

// 在dashboardWidgets中注册新的widget
app.use({
  name: 'airiot.test',
  routers: {
    '/app/': {
      path: 'myTest', // 指定路径
      breadcrumbName: '我的测试组件页', // 面包屑名称
      component: TestComponent // 注册组件
    },
  },
  dashboardWidgets: {
    'test.widget': TestWidget // 注册widget
  }
})
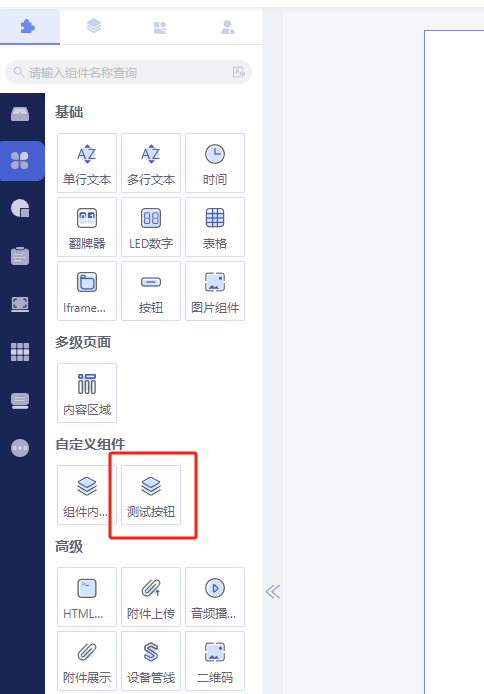
注册成功后,我们会在画面编辑页的组件库的通用组件-自定义组件中看到刚刚注册的测试按钮组件,如图所示:

自定义fieldtype
我们可以创建自定义的fieldtype来满足特定组件配置的需求。这些自定义的fieldtype需要在form_fields中注册后方可使用。
// 在这里,我们展示了如何创建自定义fieldtype以满足特定组件配置的需求
app.use({
  name: 'airiot.test',
  routers: {
    '/app/': {
      path: 'myTest', // 指定路径
      breadcrumbName: '我的测试组件页', // 面包屑名称
      component: TestComponent // 注册组件
    },
  },
  dashboardWidgets: {
    'test.widget': TestWidget // 注册widget
  },
  form_fields: {
    // 自定义数字输入框
    customNumber: {
      component: ({ input, field }) => {
        return <Input {...input} {...field.attrs} placeholder='自定义数字输入框'/>
      },
      // 解析函数
      parse: (value) => {
        return value === '' || value == null ? null : parseFloat(value)
      },
      // 属性配置
      attrs: {
        type: 'number',
        style: {
          maxWidth: 200
        }
      }
    }
  },
  // 自定义schema转换器
  schema_converter: [(f, schema, options) => {
    if (schema.type === 'number' && schema.fieldType == 'customNumber') {
      f.type = 'customNumber'
    }
    return f
  }],
})
使用自定义Fieldtype
在组件的paramSchema中使用自定义的fieldtype:
const paramSchema = {
  // 参数模式,这里定义了一个对象类型的参数模式
  type: 'object',
  // 包含的属性
  properties: {
    // 文字属性,用于定义文字内容
    text: {
      // 标题为“文字”
      title: '文字',
      // 类型为字符串
      type: 'string'
    },
    // 文字大小属性,用于定义文字的大小
    fontSize: {
      // 标题为“文字大小”
      title: '文字大小',
      // 类型为数值
      type: 'number',
      fieldType: 'customNumber' // 使用自定义的数字输入框
    },
    fontColor: {
      title: '文字颜色',
      type: 'string',
      fieldType: 'color' // 使用自定义的颜色选择器
    }
  }
}
在上述代码示例中,我们展示了如何创建自定义fieldtype以满足特定组件配置的需求。这些自定义fieldtype包括对数字类型和颜色的特殊处理。
注册成功后,当您选择该组件时,您将在组件的基本属性中看到刚刚注册的自定义fieldType所带来的效果,具体效果如下图所示:
json schema官方文档
官方json schema文档,是学习json schema的正规途径。
widget的属性
| 属性 | 说明 | 类型 |
|---|---|---|
| title | 标题 | string |
| category | 在组件列表中每种分类会按组显示 | string |
| icon | 编辑器内的图标 | string |
| component | React组件 | object |
| paramSchema | 可通过该属性拓展组件可配置属性,该属性会根据自定义的schema在属性配置自动生成表单,表单值会通过props传入component | object |